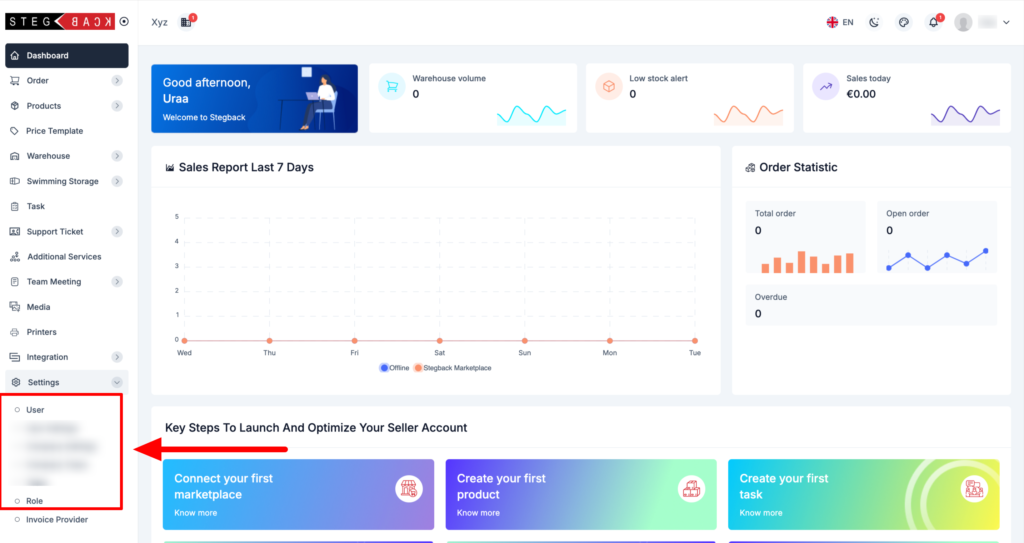
In a multi-vendor marketplace, sellers may need to manage multiple users with different levels of access. To accomplish this, sellers can create custom roles and assign them to new users. This guide will walk you through the process of creating a new role and then assigning that role to a newly created user.
Step 1: Creating a New Role
Roles allow you to define the permissions and responsibilities a user will have within the system. You can create different roles based on the tasks you want different users to handle, such as “Order Manager,” “Inventory Manager,” or “Customer Support.”

How to Create a New Role
- Navigate to the Create Role Form
Go to the section in your seller dashboard where you can create new roles. - Form Fields to Fill Out:
- Name
Enter a descriptive name for the role. For example, if you want someone to manage only orders, you might name the role “Order Manager.”
- Name
- Submit the Form
After entering the role name, click the Submit button. This will create the new role in the system, which you can now assign to users.
Example:

Once submitted, you’ll see the new role in your list of available roles.

Step 2: Creating a New User and Assigning a Role
Once a new role is created, you can assign it to new users. This allows you to give specific access levels to different people in your organization.
How to Create a New User
- Navigate to the Create User Form
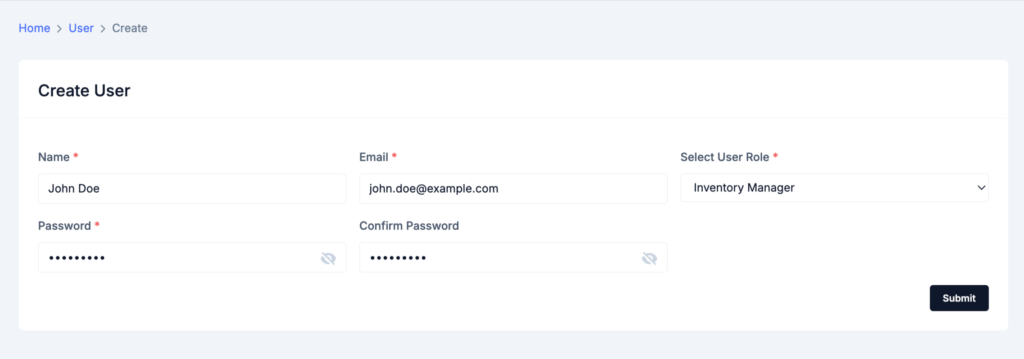
Go to the section of your dashboard where you can create new users. - Form Fields to Fill Out:
- Name:*
Enter the full name of the new user. This is a required field. - Email:*
Provide the user’s email address. This email will be used for login and communication. Make sure it’s accurate. - Select User Role:*
From the dropdown, select the role you want to assign to this user. The roles listed will include the default ones and any custom roles you’ve created, such as the one from Step 1.For example, if you created a role called “Order Manager,” select that from the list if the user will manage orders. - Password:*
Enter a secure password for the user. This password will be required for them to log into the system. - Confirm Password:*
Re-enter the password to confirm it. This ensures there are no typos in the password.
- Name:*
- Submit the Form
After filling out all mandatory fields (marked with an asterisk *), click the Submit button. The new user will be created and assigned the selected role.
Example:
- Name: John Doe
- Email: john.doe@example.com
- Select User Role: Inventory Manager
- Password: ********
- Confirm Password: ********

Once the form is submitted, the new user will receive login details and will be able to access the system with the permissions assigned to their role.
Tips for Managing Roles and Users
- Custom Roles: Custom roles allow you to fine-tune access and delegate responsibilities effectively. For instance, you might create roles like “Product Manager” for someone who handles product listings or “Support Agent” for someone who deals with customer inquiries.
- Assigning Roles Carefully: Make sure you assign the correct role to each user to prevent them from accessing parts of the system they shouldn’t. For example, a “Support Agent” role should not have access to financial data or inventory management unless necessary.
- Password Security: Ensure that users create strong passwords and advise them to update their passwords regularly to maintain the security of your seller account.
By following this guide, you can efficiently manage users and roles within your marketplace seller account, allowing for better workflow and control over your business operations.

