In a multi-vendor marketplace, sellers occasionally need to manually create orders for their customers. This could happen for several reasons—like receiving an order through a phone call, email, or other offline means. Below is a detailed guide on how to create an offline order using the provided form.
Steps to Create an Offline Order
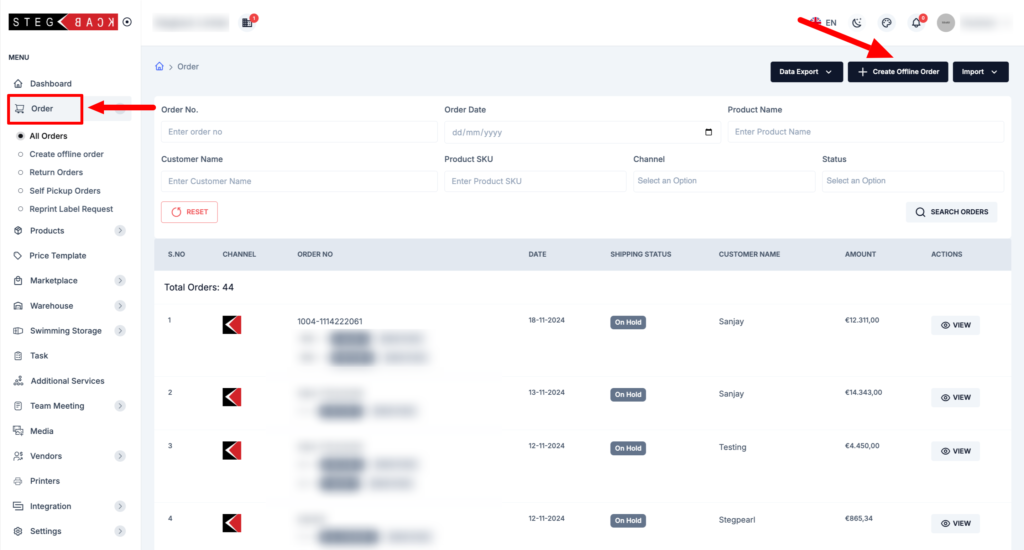
Navigate to the Orders > click Add Offline Order
When creating an offline order, you will fill out various fields categorized under Basic Order Details, Billing Address, and Product Details. Here’s a breakdown of each section:
1. Basic Order Details
The first section requires you to provide essential details about the order.
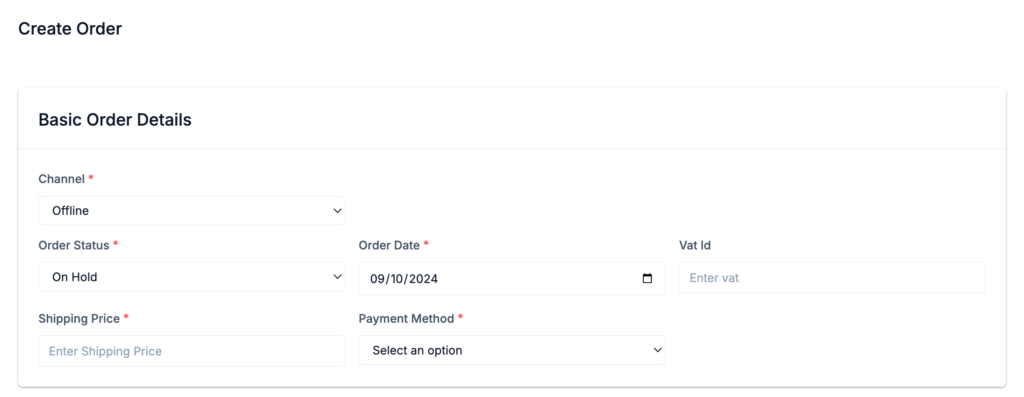
- Channel:*
Select the channel through which the order is being placed. Since you’re creating this manually, select “Offline.” - Order Status:*
Choose the status of the order from the dropdown. For example, if the order is still pending, you might choose “On Hold.” - Order Date:*
Enter the date when the order was placed. This helps in record-keeping. You can use a date picker or enter the date manually (e.g., 09/10/2024). - VAT ID:
If the order involves VAT (Value-Added Tax), enter the customer’s VAT ID here. This field is optional. - Shipping Price:*
Specify the shipping cost to be applied to this order. Be sure to enter an accurate amount as this will affect the final total. - Payment Method:*
Select the method of payment from the dropdown. You might have options like “Cash on Delivery,” “Bank Transfer,” etc. Choose the appropriate method for this order.
2. Billing Address
This section gathers the customer’s billing details.
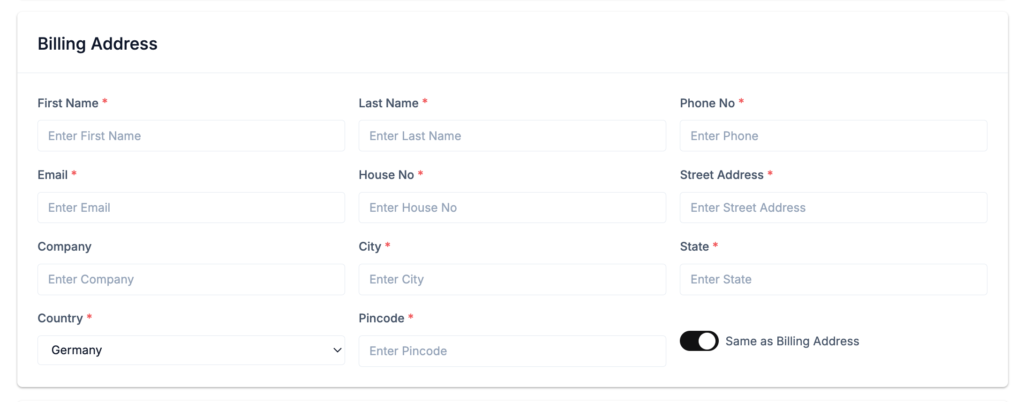
- First Name:*
Enter the first name of the customer. This is mandatory. - Last Name:*
Enter the customer’s last name. This is also mandatory. - Phone No:*
Provide the customer’s phone number. This will help with communication and order tracking. - Email:*
Enter the customer’s email address. If email communication or digital receipts are involved, this field is important. - House No:*
Input the customer’s house or apartment number. - Street Address:*
Fill in the full street address for billing purposes. - Company (Optional):
If the customer is ordering on behalf of a company, you can enter the company’s name here. - City:*
Enter the name of the city where the customer is located. - State:*
Provide the customer’s state or region. - Country:*
Choose the country from the dropdown list. In this example, “Germany” is pre-selected. - Pincode:*
Enter the postal or ZIP code of the customer’s billing address. - Same as Billing Address:
If the shipping address is the same as the billing address, you can check this box to save time. Otherwise, you’ll need to enter separate shipping details.
3. Product Details
This section allows you to input the details of the products included in the order.
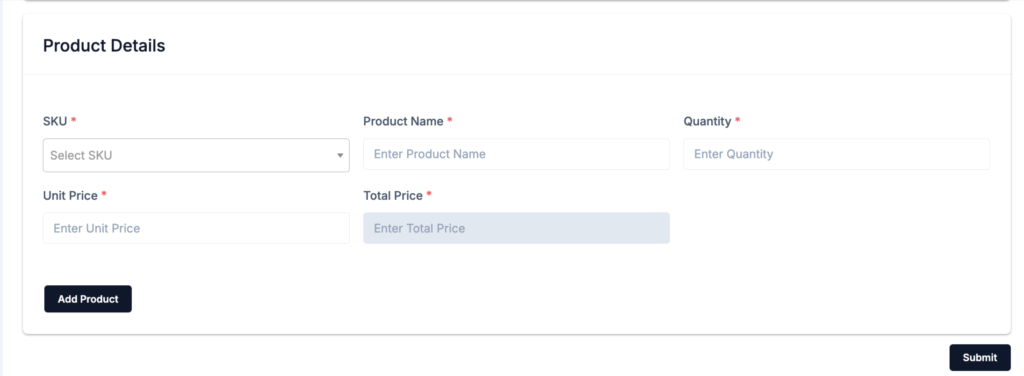
- SKU:*
Enter the SKU (Stock Keeping Unit) for the product. This helps in identifying the product accurately. - Product Name:*
Input the name of the product being ordered. - Quantity:*
Enter the quantity of the product that the customer is purchasing. - Unit Price:*
Provide the price per unit for the product. - Total Price:*
This field should calculate automatically based on the quantity and unit price you’ve entered. Ensure that the total is correct before proceeding.
Adding Multiple Products
If the customer is ordering more than one product, you can click the Add Product button. This will allow you to add additional products to the order. Each product entry will require the same details: SKU, Product Name, Quantity, Unit Price, and Total Price.
4. Submit the Order
Once you’ve filled in all the mandatory fields (*marked with an asterisk), reviewed the details, and added all necessary products, you can click the Submit button.
Upon submission:
- The order will be created in the system.
- You will be redirected to the Order Listing Page, where you can view all orders, including the newly created one.
Tips for Accuracy
- Make sure you fill out all mandatory fields to avoid any form submission errors.
- Verify that the contact details, especially the address and email address, are accurate for smooth communication and order fulfillment.